Refinished wooden coffee table with enclosed cabinet
- May 14, 2021
- 8 min read
Updated: May 15, 2021
A fun coffee table cabinet from circa 1968 that required lots of new learning: using chemical strippers, staining wood, and more.
I made a fun discovery today (29 Jan 2021)! A short drive away in Alexandria, VA there is a Habitat for Humanity Restore. It’s kind of like a thrift store, except even better (in my opinion). All the furniture, materials, appliances, etc. are donated by businesses, building contractors, suppliers, and individuals, and usually marked at 50-90% off. The best part of it is that all proceeds go to Habitat NOVA’s mission. I will start by saying that there was a wide range of items there and very different price points, and I was initially worried that I’d go in and be pretty overwhelmed by the options. However, I was happy to find that there were some pieces that were way more affordable and somehow I gravitated pretty quickly to my ultimate selection-- a little coffee table cabinet for only $15!

I will definitely be learning some new things from this project -- how to strip wood finishes that require more than sanding, staining wood, maybe some distressing, and I will possibly get to experiment some with hardware as I may replace the handles (you will soon learn that I fell in love with the original hardware and did not replace it; but we’ll come back to that). With a big snow storm possibly headed this way, I would like to make some quick decisions so that I can stock up on supplies for the initial phase of the project. To that end...
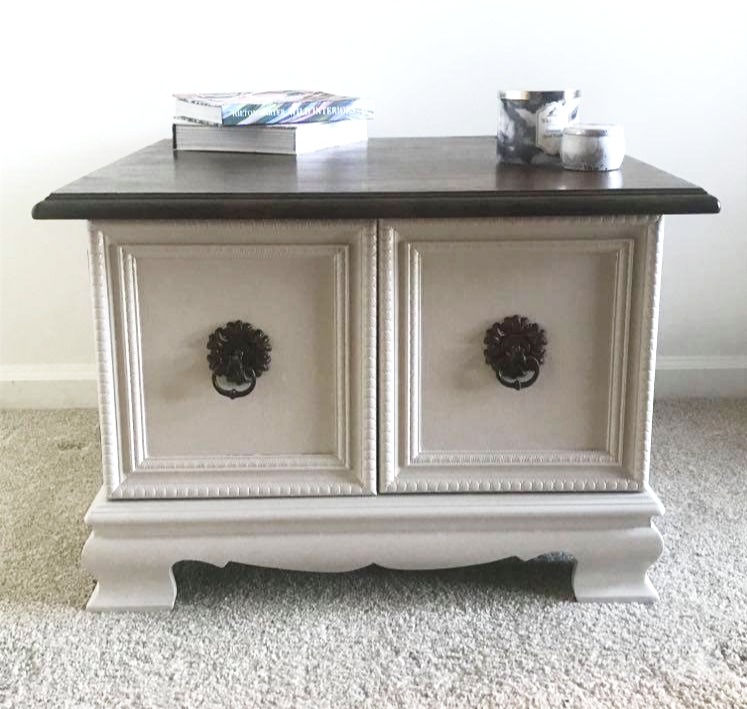
One of the first decisions: what style do I want to give this piece? After reading many furniture upcycling blogs over the last few days, I’ve really taken to the farmhouse style design. I’ve seen it for both kitchen/dining tables and for coffee tables, and given the appearance of this piece with the somewhat ornate front and nice wooden top, it seems like a good style to go with. I will re-use the light “agreeable grey” paint that I used on Project 1 for the bottom part of the coffee table and then will pick a stain for the top. I’m leaning towards a darker brown color -- perhaps a dark walnut or espresso-like color.
What I currently have for the project:
A coffee table cabinet
Sandpaper
Paint
Eye protection
Mask
What I need to get:
Citristrip
Why citristrip vs other chemical strippers? It is biodegradable, doesn’t require neutralizing, and no harsh fumes.
Plastic scrapers (NOT metal)
Heavy duty or nitrile gloves (something to protect against chemicals -- cannot use latex as Citristrip melts latex)
Tack cloth → decided to try to use an old tshirt + rag + paper towels instead
Wood stain
Top coat to protect the wood - polyurethane will probably be my go-to
I popped down to my local ACE Hardware store today to pick-up my supplies. Fortunately, I found everything pretty easily. The only real decision was the stain color and the top coat finish. I had originally planned to go with a Varathane stain, but the hardware store didn’t carry that brand. They did carry Minwax stain though, which is a similar product and really only different in that it supposedly typically requires 2-3 coats to achieve the desired color (as opposed to Varathane only requiring one); this doesn’t seem like a big deal to me though, and if anything might give me a little more opportunity to decide the exact shade that I want. They didn’t have all the same colors that I was considering when I looked online, but they had the ones I was most interested in, so I was in luck! I compared my little paint sample with the stain colors - dark walnut, ebony, and jacobean -- and decided that ebony would be the best since it was a nice dark brown with slight grey undertones that seemed to match the white/light grey paint well.
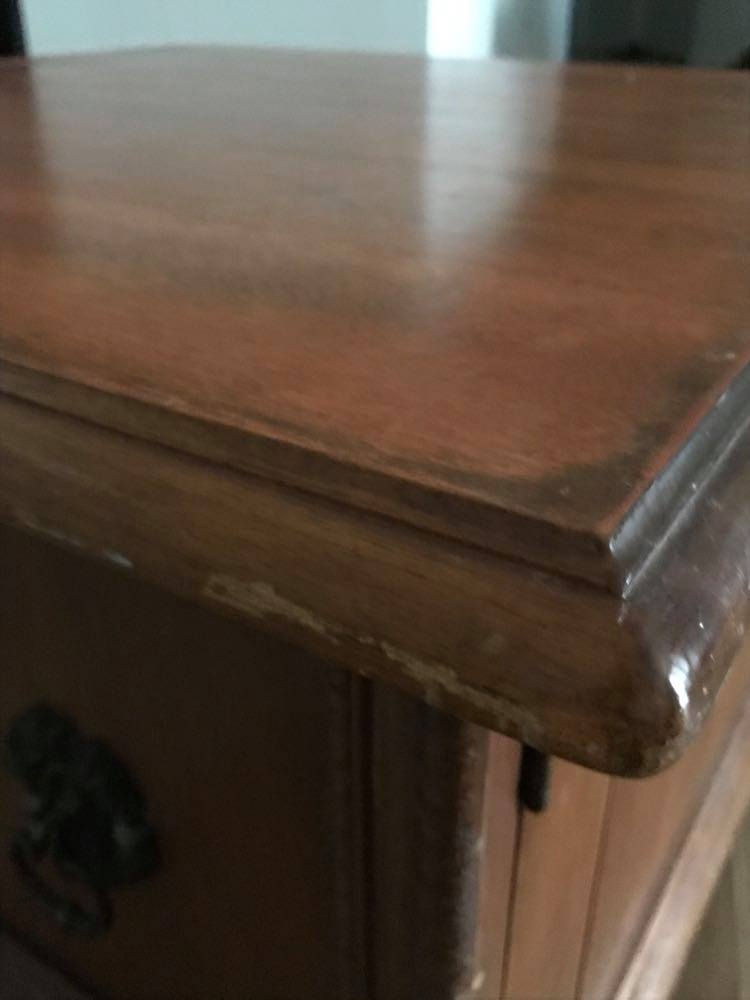
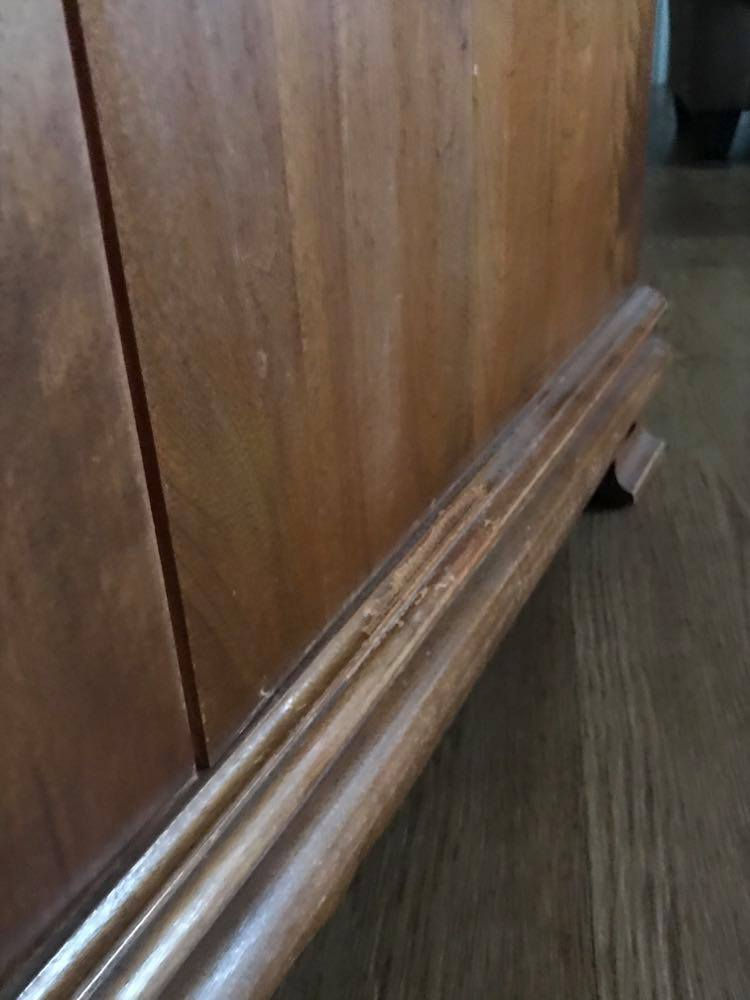
I did some initial light sanding on the top of the piece and then removed all the hardware so that I could take off the doors and take the top off of the base. In the process, I learned that one of the side panels was loose, so I will now have to get some wood glue and clamps to re-secure that panel. I will also need to sand down/patch up the spots that have taken more of a beating over the years.
Prepping for using the Citristrip process and trying to make sure first that I have everything that I need and know how to do it properly. The following was a helpful and informative blog post on using Citristrip. I’ll admit that I’m slightly anxious because as I’ve read more, I’ve learned that a) lots of gloves, even nitrile ones, seem to have negative reviews of standing up to Citristrip, so I’m struggling to find the right kind to order, b) I’m anxious to do this inside both because of the mess and the smell with all the different chemicals in this process...but fingers crossed it is AOK, and c) some reviews say that Citristrip changed its chemical formula in January 2020 and that the new version works very poorly compared to the original formula...crossing my fingers on this too that it ends up working okay.
I had to pause the project for multiple days while waiting for some additional supplies to be delivered -- disposable paint brushes to use to apply the Citristrip, an extra drop cloth, heavy duty nitrile gloves, and fine steel wool pads. But they all arrived yesterday and I finally got to give the chemical stripping a go today. Good news, I found a winning combination for gloves: i wore thin nitrile gloves (the type that you typically see doctors and nurses wearing) as an inner layer just in case the outer layer failed, but then on top of that I wore these gloves, and they worked great! I decided to test the inner side of one of the side panels of the coffee table first in case it didn’t go as well as anticipated.
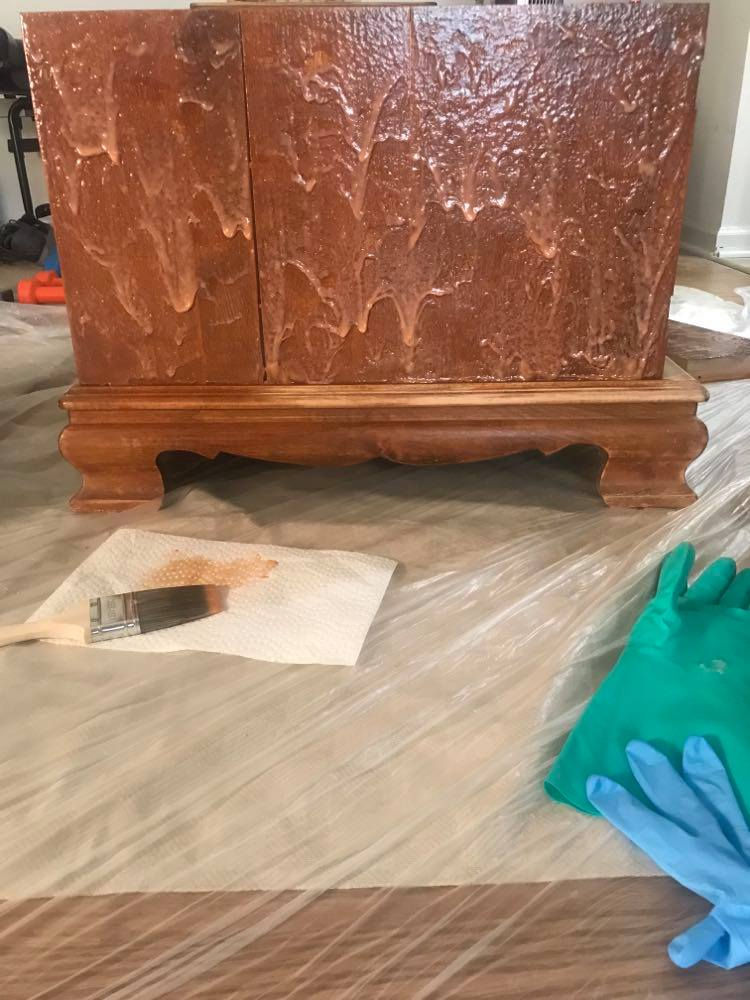
Given that I was stripping varnish + stain instead of a top coat + paint (and because I am new to this), it was honestly hard to tell whether the Citristrip had worked its way through enough of the layers. For this first panel I tested it with a plastic scraper after 30 minutes and didn’t think it was quite ready, so I waited another 30. At this point I scraped it over. It seemed to do the trick as I then started noticing the stain coloring pulling away too, suggesting that the Citristrip had successfully broken through the varnish. Seemed like enough of a success to go ahead and do the rest of it. I only waited 30-40 minutes for each section since the coffee table seemed to have a pretty thin layer of varnish and because I was starting to see it bubble already. I echo what people say in other blogs when they suggest laying the Citristrip on pretty thick. You really don’t want it to dry out and you run that risk if you use too thin of a coat.
Once I finished scraping and wiping off the Citristrip (paper towels have become my best friend for this part of the project), I went over it with wet paper towels -- A benefit of Citristrip is that it can be neutralized with water. Why is this good to know? This might be obvious, but it’s super important to know what materials you’re working with and what you plan to put on it afterwards; despite reading about mineral spirits on just about every blog out there as an easy way to remove Citristrip residue, I was planning to use a water-based latex paint on part of the table and mineral spirits only pair with oil-based products. After some googling and talking to a few friends with experience in this stuff, I learned that water should be sufficient (and hey, I saved $$). I know I know, a lot of people would recommend against this and you do have to be careful with using just water (careful...with water? odd.) since it can soften the wood, but as long as you’re careful and mainly using it just to wipe up the sticky residue, it works well! Time to busy myself while waiting for the wood to dry.
At this point, the side panels are basically all done, I previously sanded the legs and other lower portions of the table and that seems sufficient, so all that is really left are the doors (which I haven’t touched yet in this stage), and sanding the top of the table to smooth it up and remove some more of the stain. The top of the table is the part that I have to be the most careful with since it will be stained; the lower portion has a little more leeway after the stripping stage since it will be primed and painted.
I have to say, hand sanding is exhausting! I don’t even need to do a workout today because my arms are getting such a workout from the sanding. Unfortunately even if I owned a hand sander it wouldn’t be very wise to use while working inside my small apartment. Nonetheless, I’m going to explore my options for getting a small mouse sander.
I spent an afternoon finishing the hand sanding, reattaching one of the detached vertical panels of the side of the coffee table, and then priming the whole thing -- great progress! My mom made a super interesting discovery today -- I had sent a photo of the underneath of the table when I was conferring with her on a painting question and she noticed a stamp on the bottom that says “SALEM HOUSE 604”. She looked it up online and found this webpage. Turns out that this coffee table was likely made circa 1968!
Finally finished all the priming and painting and onto the last stage before re-assembling: staining and sealing the top. Now, this part is a bit more of a challenge than I anticipated as I am stuck doing it in my small-ish apartment with ~30 deg temps outside. Unfortunately the stores near me didn’t have water-based stains available in the color that I wanted, so I am stuck using oil-based stain and seal, which is way more pungent and higher in VOCs (hence the problem with doing it indoors). For future projects, I definitely want to use water-based stains instead (I know they used to get a bad rep as not being as high of quality as oil-based stains, but they’ve really come a long way). Anyways, I decided to figure out a way to make use of what I have. I explored my apartment building’s garage to see if I could maybe work down there, and I did find a decent spot, but I was worried that there would be too much dust in the air and that it would ruin the finish. I was worried too that it might not be warm enough since you want to work in an environment that is at least 55 degrees, but ideally 65-75 degrees, and we’re still in the thick of cold winter days. Thus, back to the apartment. I opened up the balcony doors and set up a fan inside blowing outwards, and a fan on the balcony blowing outwards as well. While the smell lingered a bit, it was pretty manageable and faded as the stain began to dry. Good news too: I love the look of this stain! And I think one coat should be sufficient for the color that I was aiming for.
All done and reassembled (I kept the same hardware), and I love it! I had originally planned to sell it but now I’m reconsidering whether I want to keep it.


Comments