Old Ladder-Back Wooden Chair with Cane Seat
- May 14, 2021
- 5 min read
Updated: May 15, 2021
My very first project. Full of beginner information on selecting paints, project necessities, how to cane a chair, and more!
I'll state up front that I actually wrote this a few months ago when just getting started with furniture projects and when a website was only a potentiality down the road. But what started as notes in a googledoc eventually became what you see here. I hope you enjoy!
Early January 2021....
The COVID-19 pandemic has been on-going for almost 10 months now and has led to a lot of time inside and a big shift in what hobbies and activities can be done right now (as I am sure all of you know). For multiple months I have talked about trying to give furniture upcycling a go, and coincidentally my mom mentioned having a few old wooden ladder-back chairs at home. Christmas came around and amongst my gifts was a little cane kit from my parents. I knew next to nothing about the caning process at the time, but knew that the old chairs that they had at home previously had cane seats. Thus began my first wooden chair upcycling project!
Project One: Old Ladder-Back Wooden Chair with Cane Seat
What I had when I started my research:
Picture of the wooden chair that I would be working with
A peerlessrattan cane kit that would require starting from scratch with the cane reeds (I think that’s what they’re called)

The first question I debated was what appearance I wanted the wood of the chair to have -- the primary options were stained or painted (subcategories and decisions within these to be discussed later). From the photos of the chair, I determined that even though the chairs were decent quality wood, they didn’t really have a good grain pattern that would lend towards a really nice finish with just staining. So, decision one was accomplished: I would paint the chair.
Next step was to decide what type of paint to use. This article from The Spruce was one of the most helpful sources. Based on the information on that site and others, I determined that a latex or chalk paint would be best. A latex paint is a good option because: it has low or no-VOC (volatile organic compound, aka solvents released into the air as paint dries) options, comes in a large variety of colors and finishes, and although some websites (including the link above) say that it doesn’t stand up well to heavy use, you can get mixes/blends that are more durable and can be further improved by use of a primer. A chalk paint is a good option to give an antique piece of furniture a distressed/vintage look, while adding some color and durability; one of the potential downsides is that some say that chalk paint can come with a bit of a learning curve, and frankly the vintage or “shabby chic” look isn’t for everyone. Oil-based paint would have been a good option for durability but I really wanted to avoid the high levels of VOC, price-tag, and long time required for drying. In the end, I decided to go with a latex paint, with either a satin or semi-gloss finish to add a nice shine without requiring a finisher.
Although spray primer and paint would potentially have been easier, I live in an apartment and even though I possibly could have worked on the balcony, it’s January and ~30-40 degrees every day, so a low-odor liquid paint seemed to be best.
I did some web searching for inspiration on the color scheme that I wanted. I figured the cane would be too difficult to paint evenly, especially when hand-painting, so I knew the paint had to match a light brown/tan color. I pretty quickly decided that I wanted to paint this chair a lighter color; given the limited paint that remained on the chair in the photos that I saw, it looked like it had been a lighter color before and would be a good choice again. Frankly, I am not one for super bright or statement colors, at least not in furniture. I like versatile pieces that match a lot, and usually I add those touches of color with embellishments and decor. With that in mind, I perused the Sherwin Williams paint colors website and started looking in the “neutrals section”. I ended up settling on a color called “agreeable grey” for a warm-toned off-white/grey color (thanks Dad for the input!).
With a lot of the initial decisions made, I started my purchase list:
Sand paper (both 80-100 grit and 150-200 grit)
Hand-held sanding blocks with dual grits are super useful and way easier on the hands. However, for pieces with embellishments, small nooks and crannies, rungs or a seat, etc., sand paper pieces are helpful to have to be able to do it by hand.
Paint brush(es)
Painters tape (ended up not needing for this one, but always useful to have)
Primer (light vs. dark to match the desired paint color)
Paint!
Drop-cloth for working inside an apartment
Luckily for me, the prior layers of paint on the chair had been mostly stripped already and I did not need to buy stripping gel, chemical gloves, or steel wool (hence why those are not listed amongst my purchase list above, even though it would normally be required).
What I learned while hand-sanding: I probably should have worn a mask. Even with hand sanding, the particles floated around a bit more than expected, and I definitely felt it in my throat/lungs a bit for a day or two. I will definitely keep this in mind in the future, and you should too. Health and safety come first!!
I ended up applying two layers of primer to ensure I had it well-coated, especially because of what I had read about water-based paints and how to get the best set/appearance. Be careful of bleed-through if you haven’t sufficiently wiped off the sanding dust prior to painting; if you run into this, you should wait for the primer to dry sufficiently and add an extra coat until the yellow-ish tint is gone. I also did two coats of paint. Both went pretty smoothly (no pun intended).

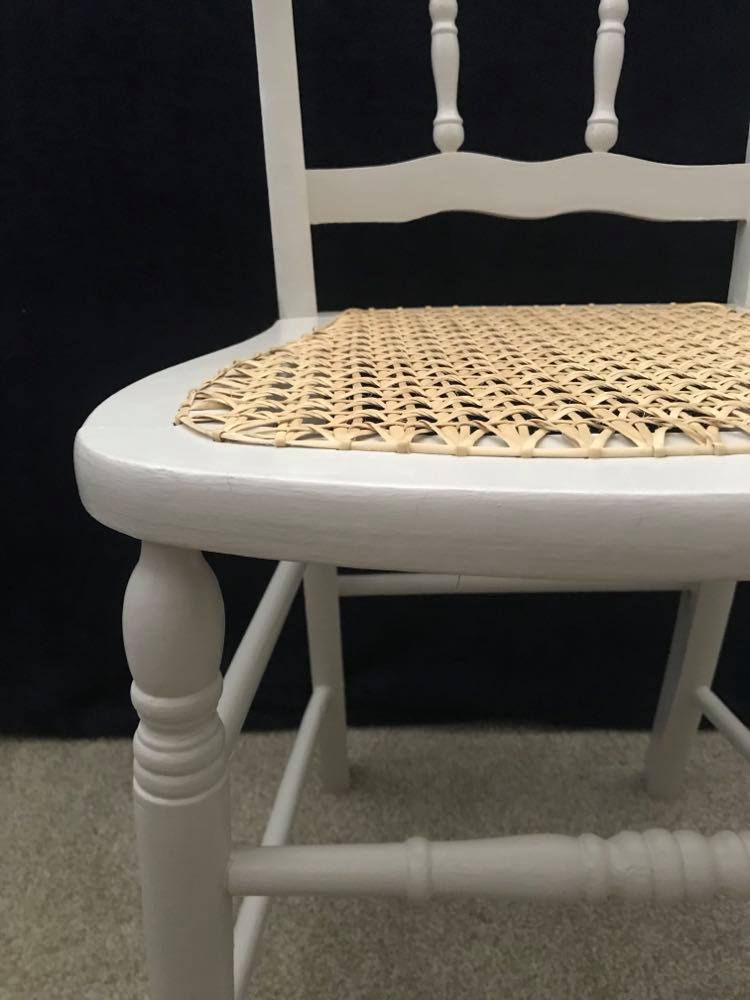
On to the next phase...I learned from caning the chair that it takes WAY longer than I anticipated. While I put TV shows on in the background to keep me entertained over the many hours that I spent completing the cane seat, caning does require paying fairly close attention to ensure you do each step right and don’t mess up the pattern. This is definitely a skill that requires repetition to really get a knack for it -- knowing the proper temperature for the water and amount of time to soak the cane for, what the best length of cane is to work with at a given time, how to optimize the weaving method to be as efficient as possible, etc. I was admittedly confused when I first read the instructions booklet, but Peerlessrattan.com videos were super helpful at providing a step-by-step tutorial of the process. And after many hours, I had a completed chair!


Comments